Getting Started with Image Processing in Mobile Devices Using Javascript, Ionic and MarvinJ
In this article, we will learn how to setup Ionic to run with MarvinJ, load an image and apply some image processing filters. MarvinJ is a pure Javascript image processing framework based on Marvin. You can use it for image processing on web, server and mobile environments.
To be able to run and test our application, we need to install the following dependencies:- GitHub
- Node.js
- cordova
- ionic
1. Install Node.js
Download it directly from the Node.js page or use a manager to install it like nvm (Node Version Manager).The Node.js version we are going to work is 8.4.0.
To use nvm, download and Install nvm for Linux/Mac or Windows.
Open your prompt and type the following command:
# Linux and Mac users may have to add the sudo command. >>> nvm install "8.4.0" && nvm use "8.4.0"
2. Install Cordova and Ionic
To Install ionic and Cordova, open your prompt and type the following command:
# Linux and Mac users may have to add the sudo command.
>>> npm install -g cordova ionic
# Create a blank application: >>> ionic start helloMarvin blank && cd helloMarvin
# Test your blank application: >>> ionic serve
3. Install Marvin
Download the marvin from here to your /helloMarvin directory
# Install npm marvin module: >>> npm install ./marvin --save
Now let’s test if Marvin is property installed.import { Component } from "@angular/core";
import { NavController } from "ionic-angular";
// import MarvinImage
import { MarvinImage } from "marvin";
@Component({
selector: "page-home",
templateUrl: "home.html"
})
export class HomePage {
constructor(public navCtrl: NavController) {
// log MarvinImage object
console.log(MarvinImage)
}
}
If everything is working fine you should see the MarvinImage object printed in the javascript console.
4. Load an image
Copy an image called “test_image.jpg” to the folder /helloMarvin/src/assets.
Let’s add a card with a canvas to our view.<ion-header>
<ion-navbar>
<ion-title>
<!-- Add title -->
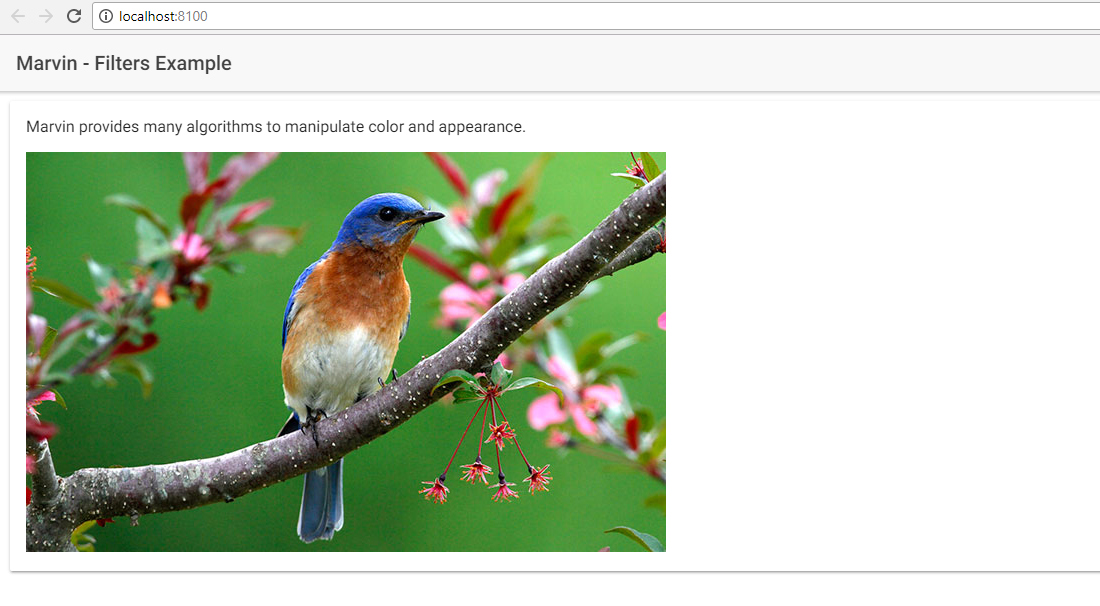
Marvin - Filters Example
</ion-title>
</ion-navbar>
</ion-header>
<ion-content>
<!-- Add card with a canvas -->
<ion-card>
<ion-card-header>
Marvin provides many algorithms to manipulate color and appearance.
</ion-card-header>
<ion-card-content>
<canvas width="640" height="400" id="canvasFilters" style="max-width:100%;"></canvas>
</ion-card-content>
</ion-card>
</ion-content>
Update the component to load the image into the canvas.
...
export class HomePage {
originalImg: MarvinImage;
imageSrc: string = "/assets/test_image.jpg";
constructor(public navCtrl: NavController) {
this.loadImage();
}
refreshCanvas(image: MarvinImage) {
image.draw(document.getElementById("canvasFilters"));
}
loadImage(){
let self = this;
this.originalImg = new MarvinImage();
this.originalImg.load(this.imageSrc, function(){
self.refreshCanvas(this);
});
}
}
Now you should see a card with a canvas where its content is the same of the “test_image.jpg” image.
5. Applying image filters
First let’s create our filters:import { Marvin, MarvinImage } from 'marvin';
export abstract class Filter {
name: string;
constructor(name: string) { this.name = name; }
abstract applyFilter(img1: MarvinImage, img2: MarvinImage): MarvinImage;
}
export class GrayScaleFilter extends Filter {
applyFilter(img1: MarvinImage, img2: MarvinImage){
Marvin.grayScale(img1, img2);
return img2;
}
}
export class BlackAndWhiteFilter extends Filter {
level: number;
constructor(name: string, level: number) {
super(name);
this.level = level;
}
applyFilter(img1: MarvinImage, img2: MarvinImage){
Marvin.blackAndWhite(img1, img2, this.level);
return img2;
}
}
export class SepiaFilter extends Filter {
intensity: number;
constructor(name: string, intensity: number) {
super(name);
this.intensity = intensity;
}
applyFilter(img1: MarvinImage, img2: MarvinImage){
img2.clear(0xFF000000);
Marvin.sepia(img1, img2, this.intensity);
return img2;
}
}
export class EmbossFilter extends Filter {
applyFilter(img1: MarvinImage, img2: MarvinImage){
Marvin.emboss(img1, img2);
return img2;
}
}
export class EdgeDetectionFilter extends Filter {
applyFilter(img1: MarvinImage, img2: MarvinImage){
img2.clear(0xFF000000);
Marvin.prewitt(img1, img2);
return img2;
}
}
export class ResetFilter extends Filter {
applyFilter(img1: MarvinImage, img2: MarvinImage){
return img1;
}
}
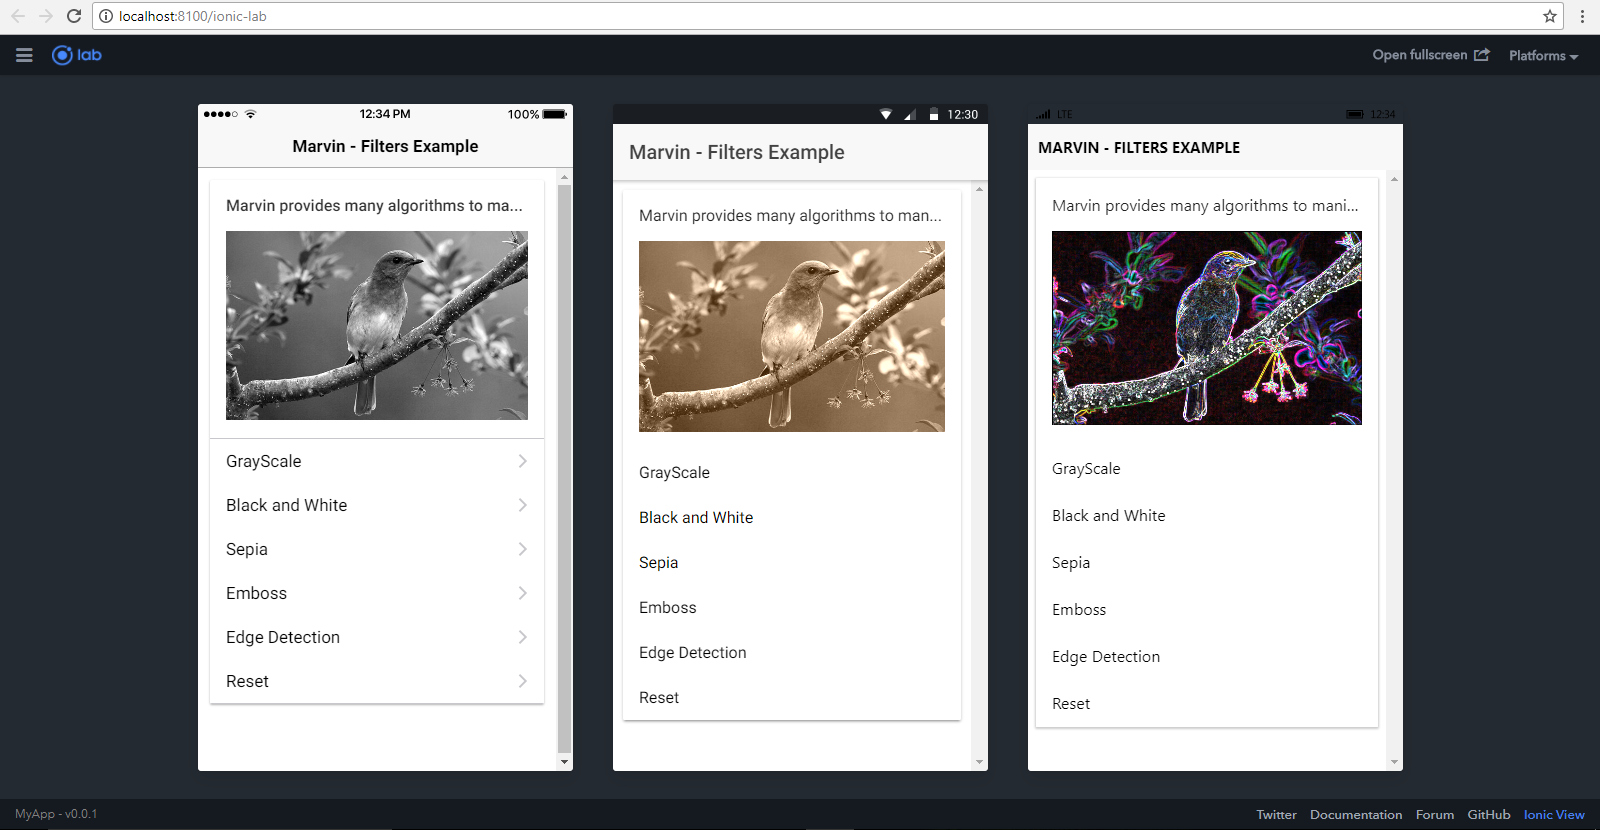
Each filter will apply a transformation to the original canvas image. To see how each filter works, look at the documentation.
Now let’s modify our component to configure our filters and handle the click event.# File /helloMarvin/src/pages/home/home.ts
import { Component } from '@angular/core';
import { NavController } from 'ionic-angular';
// import
import { MarvinImage } from 'marvin';
//import Filters
import { Filter, GrayScaleFilter, BlackAndWhiteFilter, SepiaFilter, EmbossFilter, EdgeDetectionFilter, ResetFilter } from '../../app/models/filter';
@Component({
selector: 'page-home',
templateUrl: 'home.html'
})
export class HomePage {
originalImg: MarvinImage;// original image
outputImg: MarvinImage;// modified image by the filters
imageSrc: string = "/assets/test_image.jpg";// path to the test image
filters: Filter[] = [];// filters to bind in the list
constructor(public navCtrl: NavController) {
this.loadImage();
this.setupFilters();
}
refreshCanvas(image: MarvinImage) {
image.draw(document.getElementById("canvasFilters"));
}
loadImage(){
let self = this;
this.originalImg = new MarvinImage();
this.originalImg.load(this.imageSrc, function(){
self.refreshCanvas(this);
// create an empty MarvinImage with the same dimesions of the originalImg
self.outputImg = new MarvinImage(this.getWidth(), this.getHeight());
});
}
itemSelected(filter: Filter) {
// handle the click event
let img = filter.applyFilter(this.originalImg, this.outputImg);
this.refreshCanvas(img);
}
setupFilters(){
this.filters.push(new GrayScaleFilter("GrayScale"));
this.filters.push(new BlackAndWhiteFilter("Black and White", 30));
this.filters.push(new SepiaFilter("Sepia", 30));
this.filters.push(new EmbossFilter("Emboss"));
this.filters.push(new EdgeDetectionFilter("Edge Detection"));
this.filters.push(new ResetFilter("Reset"));
}
}
Add our filters to the view
# File /helloMarvin/src/pages/home/home.html
...
<ion-content>
<!-- Add card with a canvas -->
<ion-card>
...
<!-- Add list of filters -->
<ion-list>
<button ion-item *ngFor="let filter of filters" (click)="itemSelected(filter)">
{{ filter.name }}
</button>
</ion-list>
</ion-card>
</ion-content>

6. Testing in the Mobile Environment
# Serve ionic as a mobile application
>>> ionic serve -l
On the top right corner you can add iphone, android and windows phone.
7. Download the Project
You can download this project here.